|
Developers:
|

|
Colette Coyne
St. Dominic School
Philadelphia, PA
|
Dr. Steve Bohan
Rohm and Haas Company
Bristol, PA
|
|
|
|
Grade
Levels:
|
|
4-5-6
|
|
|
|
Discipline:
|
|
Heat and Energy
|
|
|
|
Goals:
|
|
Students will come to learn that different types of light
affect matter differently. In particular we wish to show
that in sunlight there are several components, some of which
can be harmful even though they cannot be seen or felt.
|
|
|
|
Special
Objectives:
|
|
Students will come to see that different lights have an
effect on matter. In particular, the students will see the
effects of ultraviolet light concluding that even though it
cannot be seen, it is powerful and can cause change.
|
|
|
|
Background:
|
|
The spectrum of light which we see is only a tiny part of
what makes up sunlight. The sunlight has many components,
some of which we can see and feel, and some which we cannot.
Yet, each part of sunlight can cause changes to occur in
matter both individually and collectively. Three of the many
components of sunlight used in this experiment are familiar
to most children. They are: infrared, visible or
incandescent, and ultraviolet light.
|
|
|
|
Materials:
|
|
- 1 prism
- 1 infrared heat lamp (250 Watts)
- 1 soft white incandescent light (200 Watts)
- 1 ultraviolet lamp
- Appropriate lighting apparatus needed for all sources
as bulbs get VERY hot. Lighting apparatus should also
shield the children's eyes from the direct light of the
bulbs.
- 2 pieces of 8 1/2 x 11 inch ORANGE construction paper
- 6 cardboard cutouts - same size and shape (geometric
shapes, paper dolls, etc.)
- 5 thermometers
- tape
- timer
- graph for charting results
|
|
|
|
Management:
|
|
This experiment cannot be done in one class period. It
can be completed over the course of a 2-hour period.
This is a teacher demonstrated experiment. It
can be done in conjunction with other experiments on heat
and light energy.
|
|
|
|
Procedure:
|
|
- To begin this experiment, use a prism to show that
light is made up of many things, like the colors of the
spectrum. Even though we cannot see them , the colors as
well as other forms of energy are there.
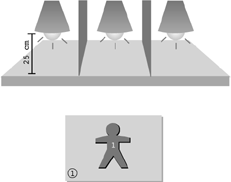
- The teacher will set up lights, making sure bulbs are
facing downward about 25 cm from the flat surface your
samples will be resting on. If lights are hanging side by
side, be sure to place a non-flammable barrier between
them. Otherwise spread out the lights.
- Cut each piece of orange construction paper into 4
equal parts. This will leave you with 8 samples.
- Tape 1 cutout to the center of each sample. Do not
use a lot of tape. The 2 blank pieces are extra.
- Label the samples from one to six. Be sure to label
each cutout 1-6. In this way, you will not get the
samples confused when you observe them.
- Turn on the lights. Introduce each light to the
children. Ask if they have ever seen the lights. Explain
the uses of each light.
a. Infrared (heat lamp) #1:
This lamp is used for commercial purposes. It is used to
dry things quickly. It helps keep food warm in
restaurants.
b. Incandescent lights #2:
This light is the kind of lights found in our homes. They
are used to help us see in the darkness.
c. Ultraviolet lights. #3:
This kind of light helps chemical reactions to occur.
Plants use this to make food and help them to grow.
Dentists use them to help things bond. Some companies use
them to help things adhere quickly.
- Once the lights are on, let the children feel the
heat differences by placing their hands under each light.
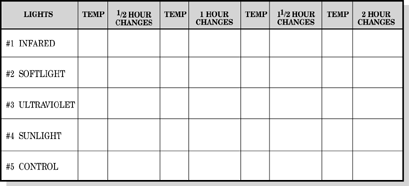
Let them describe the way they feel. Record what they
feel on the chart.
- Take the temperature of each light by placing a
thermometer under each for about 5 minutes. Record the
temperature on the chart.
- Make predictions about each lamp once you have
recorded the temperature.
- Ask: If I were to place a rock under each
light, what would happen to it? If I were to
place a rock in the sunlight, what would happen to it?
- Record all the answers the children offer.
- Now, place the picture labeled 1 under the infrared
light (#1). Place the picture labeled 2 under the
incandescent light (#2). Place the picture labeled 3
under the ultraviolet light (#3). Place picture #4 in the
sunniest spot in your room. Place picture #5 and #6 in
your drawer away from light.
- Make predictions about what changes the children will
see and feel. Let the paper sit in the light for 1/2
hour. Set the timer.
- After 1/2 hour, take each sample from beneath the
lamps. Let the paper sit in the light for 1/2 hour. Set
the timer.
- Place the cutout back on the samples (don't mix them
up). Take the temperature under each lamp. Record the
results. Place the samples back under each lamp as you
did in step #10. Set the timer and check again in 1/2
hour.
- At each 1/2 hour interval, record the changes on each
sample. Be sure to take the temperature before placing
them back under the lights.
- At the end of 2 hours, take samples from under the
lights and turn the lights off. Remove the cutout from
each sample. Compare each sample to the control in the
drawer. Compare each sample to the one left in the sun.
- Which of the samples look very different? Which ones
changed the most? Which samples changed the least? How do
the results compare with the predictions? Did the
samples under the hottest temperatures change the most?
Did the samples under the ultraviolet light change
at all?
|
|
|
|
Conclusion:
|
|
Guide the children's thinking to conclude that sunlight
and ultraviolet light caused the most change. Help the
children realize that even though they could not feel the
heat of the ultraviolet light, the ultraviolet light did
indeed create a visible change. Tell the children
that the sunlight is a combination of all three of
these lights and it is a very powerful form of energy.
|
|
|
|
Extensions:
|
|
On a cloudy, overcast day, place sample #6 on the
windowsill. Compare results with other samples.
Draw a mural showing how sunlight affects plants.
Write to suntan lotion companies asking for statistics on
how their products protect people from the sun.
Have children create their own "sunscreens". Clothes,
lotion, umbrellas, hat, whatever. Have them draw a picture
of their creations. Have them write an ad campaign to
explain how it works. Use persuasive writing to get people
to buy their products.
Find information and make a bulletin board concerning
ozone depletion and ways to counteract the trend.
Get books on solar power and design ways to harness the
sun's energy.
Bring in a guest speaker to talk about recycling.
Plant a tree.
|